Bake polymer clay evenly without burn marks. Learn how an oven thermometer, ceramic tile, foil tent, and the right tray surfaces prevent hot spots and dark b...
Baking Polymer Clay on Curves for Bangles and Hoops

Dimple
Dimple is the cheerful hamster host of Clay Bakehouse who absolutely loves transforming brightly colored clay into tiny, adorable masterpieces. Whether readers are rolling their very first clay ball or baking delicate custom earrings, Dimple is always there with a warm smile to celebrate every squish and shape.
Published · Last updated
Let’s roll out some colorful clay and make something wonderfully round today. Curves are where polymer clay jewelry really shines, but only if the clay is supported while it bakes. In this guide, you’ll learn what to bake on, what to avoid, and how to get clean loops for bangle bracelets and hoop earrings without flat spots, cracks, or surprise dents.
Why curved baking needs support
Polymer clay softens as it heats, then firms back up as it cures. On a flat tray, curved pieces love to sag, oval out, or develop a little flat “resting spot.” A heat-safe form (also called an armature or baking support) keeps your curve consistent while the clay cures all the way through.
Curved baking is extra helpful for:
- Bangle bracelets and cuff-style loops
- Hoop earrings and hoop components you’ll later attach to findings
- Rings or ring-like connectors
- Arched beads and curved slab components
Quick safety check
Polymer clay cures at relatively low temperatures, but your support still needs to be oven-safe, stable, and non-melting. Use this checklist:
- Rated for your clay’s cure temperature (often around 230 to 300°F, or 110 to 150°C, depending on brand).
- No plastic, no vinyl, no foam, no rubber. These can soften, melt, or off-gas.
- Stable shape. If your form can deform under heat or pressure, your clay will copy that deformation.
- Clean surface. Dust, lint, seams, and texture can transfer into softened clay.
For oven setup basics like thermometers and baking tiles, hop over to Essential Oven Tools for Baking Polymer Clay.
Best supports for bangles and hoops
These are the most reliable options because they hold shape and tolerate curing temperatures comfortably.
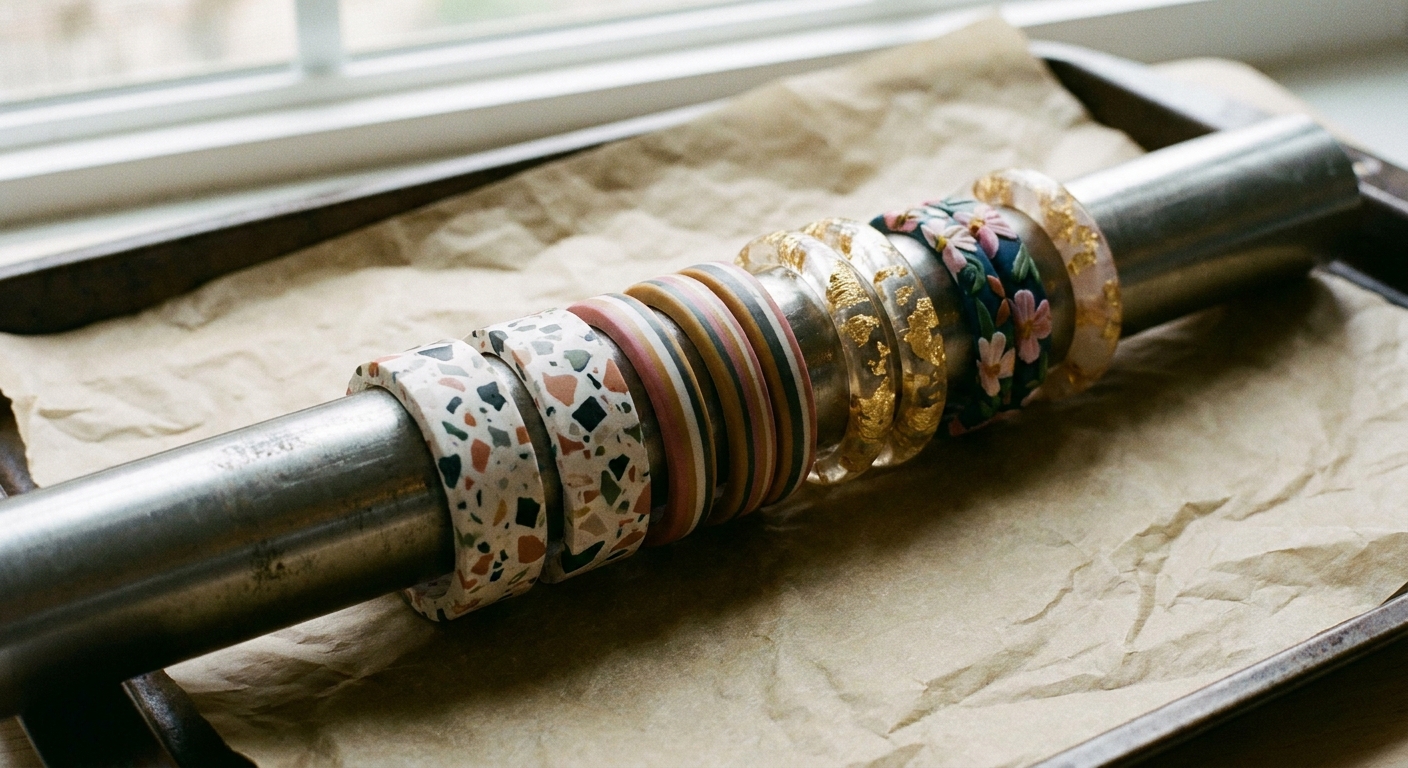
Metal bracelet mandrels and ring mandrels
If you already have jewelry tools, mandrels are the neatest choice. They are smooth, heat-safe, and made for consistent sizing.
- Best for: bangles, cuffs, ring components, evenly sized hoop elements
- Tips: support the mandrel so it cannot roll. Nestle it in crumpled foil or on a ceramic tile with foil “chocks.”
Stainless steel cookie cutters (round) and metal hoops
Round cutters can act like mini mandrels for hoop components. Metal holds steady heat and stays true to shape.
- Best for: small to medium hoops and loop connectors
- Tips: avoid sharp cutter seams pressing into clay. Rotate the seam away from the visible face, or buffer with a thin paper layer.
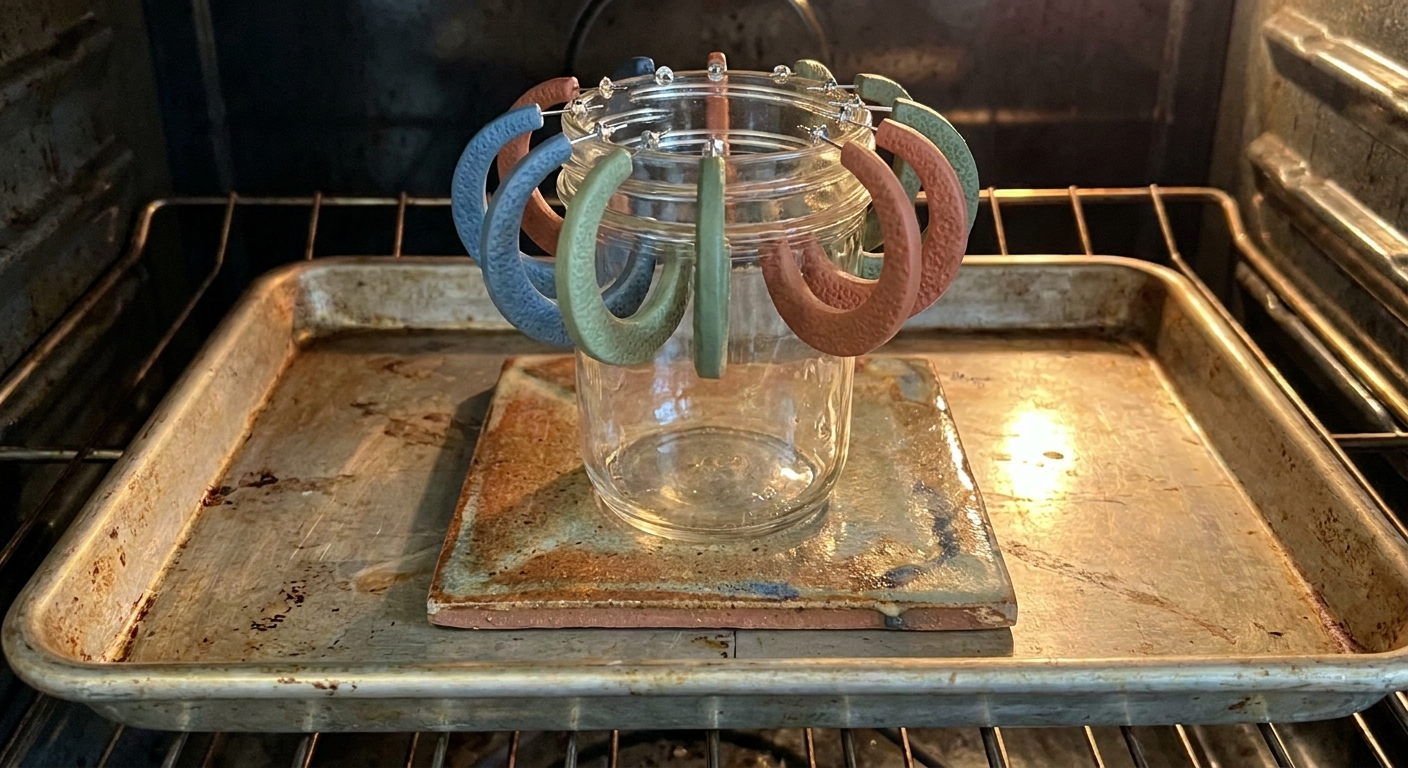
Glass bottles and glass jars
Smooth glass is a favorite for gentle curves. Choose plain, label-free glass that can handle oven heat.
- Best for: larger hoops, wide bangles, curved slab pieces
- Tips: place the bottle or jar on a tray so it cannot roll. Always bake on a stable surface like a ceramic tile.
- Glass note: avoid thermal shock. Let the glass warm up and cool down with the oven, and do not move hot glass onto a cold surface.
Ceramic or porcelain forms
Ceramic is wonderfully oven-safe and steady. Small bowls, ramekins, or spoon rests can give you clean arcs.
- Best for: arched slabs, domed earrings, curved components
- Tips: choose glossy glazed surfaces for easier release, or add a barrier layer (more on that below).
Aluminum foil forms (surprisingly useful)
Foil is heat-safe and easy to shape into custom curves. It is a great option for one-off sizes or odd shapes.
- Best for: custom bangle diameters, oval hoops, asymmetric curves
- Tips: compress foil firmly so it does not shift or squish. A loose foil wad can compress under handling or the clay’s weight, and your curve will follow.
Household items: yes and no
Good household options
- Plain glass spice jars (no plastic lids in the oven)
- Glass votive holders for smaller hoops
- Ceramic ramekins or mini bowls
- Metal measuring cups (smooth, no coatings that could mark clay)
- Metal piping tips for tiny hoops and connectors
Skip these
- Anything plastic or rubber. It can melt or off-gas at curing temperatures.
- Silicone bakeware for shaping curves. Silicone is usually temperature-safe, but it flexes. The issue is support, not safety. If you use it, keep the piece braced so the curve stays true.
- Wood, cardboard, and paper tubes. They can scorch or brown, and they can leave texture or marks on warm clay. They are also harder to keep perfectly smooth and steady.
- Nonstick-coated mystery metal. If you are not sure about the coating, choose glass or plain stainless steel instead.
How to prevent sticking and shiny spots
Warm polymer clay can cling a little to super smooth surfaces, and it can also pick up shiny contact patches or texture transfer. A simple barrier layer keeps things peaceful and makes release easier.
Easy barrier layers
- Parchment paper: a great all-purpose barrier that stays fairly smooth.
- Plain copy paper: works in a pinch. It can leave a faint paper texture on very soft clays.
- Cornstarch dusting: a tiny amount can reduce tackiness during handling. Use lightly so you do not dull the surface.
- Foil as a barrier: can imprint tiny foil texture unless it is very smooth and tightly wrapped.
If you want your curves to look extra sleek right out of the oven, smoothing before baking matters. This guide is a good helper: How to Smooth Raw Polymer Clay.
Method: bake a bangle on a form
This approach works whether you are using a metal mandrel, glass jar, or a firm foil form.
Best beginner setup: a glass jar wrapped with parchment on a ceramic tile, with foil chocks to stop rolling.
1) Choose a size and build a stable setup
- Pick a form close to your finished inner diameter.
- Set the form on a ceramic tile or sturdy tray.
- Block rolling with foil chocks if needed.
2) Build the bangle shape
Common bangle builds include:
- Strip wrap: roll a long even snake or strip and wrap it around the form.
- Slab wrap: cut a uniform strip from a slab and wrap for a clean, modern look.
- Segmented build: join multiple pieces like terrazzo chunks or cane slices.
3) Join seams carefully
Where the ends meet is the weak point. Press and blend the seam on the inside and the outside. A tiny bit of liquid polymer clay can help strengthen joins, especially on thicker bangles. (If you love liquid clay tricks, visit 7 Creative Ways to Use Liquid Polymer Clay.)
4) Support the curve so it stays round
If your bangle is wrapped snugly, you are already halfway there. If it is sitting more like an arch or a drape, prop low points with small foil supports so it cannot sag into a flatter oval.
5) Bake by brand directions (and thickness)
Use the curing time and temperature recommended on your clay package. If your bangle is thick, it may need the full recommended time (or a bit longer within your brand’s guidance) to cure all the way through. An oven thermometer helps a lot because small temperature swings can cause brittleness or darkening.
6) Cool before removing
Let the piece cool on the form until it is room temperature. Warm polymer clay is slightly flexible and can distort if you tug it off too soon.
Method: bake hoop earrings on supports
Hoops need two things: a clean curve and secure attachment points. You can bake hoops as complete circles or as curved components that hang from jump rings.
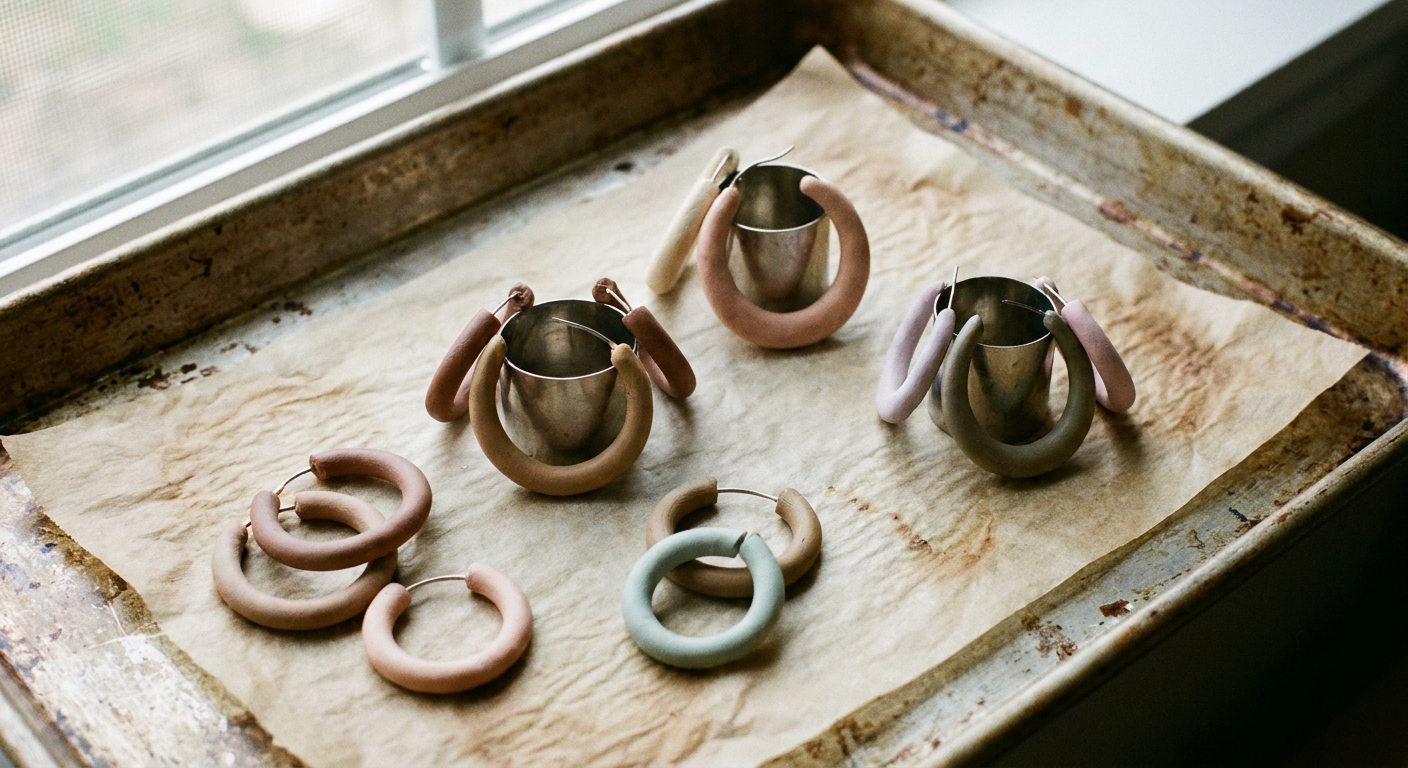
Best beginner setup: a metal piping tip or small glass jar with a parchment strip, set on a tile and blocked so it cannot roll.
Option A: bake hoop components
- Cut or roll your hoop shape (thin strip, rope, or slab-cut band).
- Drape it over a small form like a metal piping tip, small glass jar, or round cutter.
- Keep the ends evenly supported so both sides match.
- Bake and cool completely before moving.
- Add holes after baking by drilling, or pierce before baking if the design allows.
If you are deciding between piercing and drilling for clean, strong holes, this article helps: Piercing vs Drilling Polymer Clay Earring Holes. For assembling hoop components with hardware, see Jump Rings and Pliers for Clay Earrings.
Option B: bake a full hoop
Full circles are adorable, but the join must be strong. Use a firm support (metal or glass), keep the hoop thickness consistent, and reinforce the seam.
- Reinforce the join: blend the seam thoroughly, then add a tiny backing strip on the inside of the hoop, or use a thin smear of liquid clay and press firmly to create a mechanical bond.
- Keep it even: uneven thickness can cure unevenly, which is where weak spots like to hide.
Common problems and fixes
Flat spots
- Cause: the piece rested on a tray or sagged against one point.
- Fix: bake on a form that supports the full curve. Add foil props under low points.
Cracks at the seam
- Cause: ends not blended well, clay too stressed, or the join too thin.
- Fix: blend longer, thicken the join area slightly, and consider a tiny bit of liquid clay as a join helper.
If you already have a cracked baked piece, don’t panic. Visit How to Fix Cracked or Broken Baked Polymer Clay.
Hoops turned oval
- Cause: the support rolled or shifted, or the hoop was moved while still warm.
- Fix: stabilize the form so it cannot move. Let hoops cool fully on the form before removing.
Shiny spots or texture transfer
- Cause: direct contact with very smooth metal, wrinkly foil, or handling marks.
- Fix: use parchment as a barrier, compress foil forms firmly, and smooth clay before baking.
Darkening or scorching
- Cause: oven running hot or uneven heat near heating elements.
- Fix: verify temperature with an oven thermometer, tent loosely with foil, and bake on a ceramic tile for gentler heat.
Finish curves without flattening them
Curves are strong, but sanding pressure can flatten edges if you squeeze too hard. Gentle finishing keeps your bangles and hoops looking crisp.
- Sand with the curve: wrap sandpaper around a soft sponge or flexible sanding pad so it follows the arc.
- Polish lightly: buffing works best with a light touch.
- Glaze only if needed: polymer clay can be naturally matte or satin depending on brand and sanding, and not every piece needs a topcoat.
For a deeper finishing rabbit hole, these are handy reads: Sand and Polish Polymer Clay and Polymer Clay Glazes Explained.
Curved baking FAQs
Can I bake polymer clay directly on metal?
Yes, plain metal is oven-safe. If shiny contact spots or release bothers you, add parchment or a thin paper barrier.
Is aluminum foil safe in the oven with polymer clay?
Yes. Foil is a common support material at polymer clay curing temperatures. Compress it firmly if you need it to hold a specific curve.
Do I need an armature inside a polymer clay bangle?
Usually not if the bangle is thick and well-joined, but it does need a supporting form during baking so the circle stays round.
Should I pierce hoop holes before or after baking?
Both can work. Piercing before baking is quick, but holes can distort if the piece shifts. Drilling after baking is slower but gives very crisp holes. This guide breaks it down: Piercing vs Drilling Polymer Clay Earring Holes.
Curve checklist
- Pick a form that is metal, glass, ceramic, or firmly compressed foil.
- Stabilize the form so it cannot roll or shift.
- Use parchment or paper if you want easy release and fewer shiny contact spots.
- Support saggy areas with foil props.
- Bake at the brand-recommended temperature and time (and give thick pieces enough time to cure fully).
- Cool fully on the form before removing, especially when using glass.
Once you’ve baked a few perfect arcs, curves start feeling like magic. Now go make those hoops loopier and those bangles bouncier, one happy little squish at a time.