Bake polymer clay evenly without burn marks. Learn how an oven thermometer, ceramic tile, foil tent, and the right tray surfaces prevent hot spots and dark b...
Embedding Glass Cabochon Eyes in Polymer Clay Creatures

Dimple
Dimple is the cheerful hamster host of Clay Bakehouse who absolutely loves transforming brightly colored clay into tiny, adorable masterpieces. Whether readers are rolling their very first clay ball or baking delicate custom earrings, Dimple is always there with a warm smile to celebrate every squish and shape.
Published
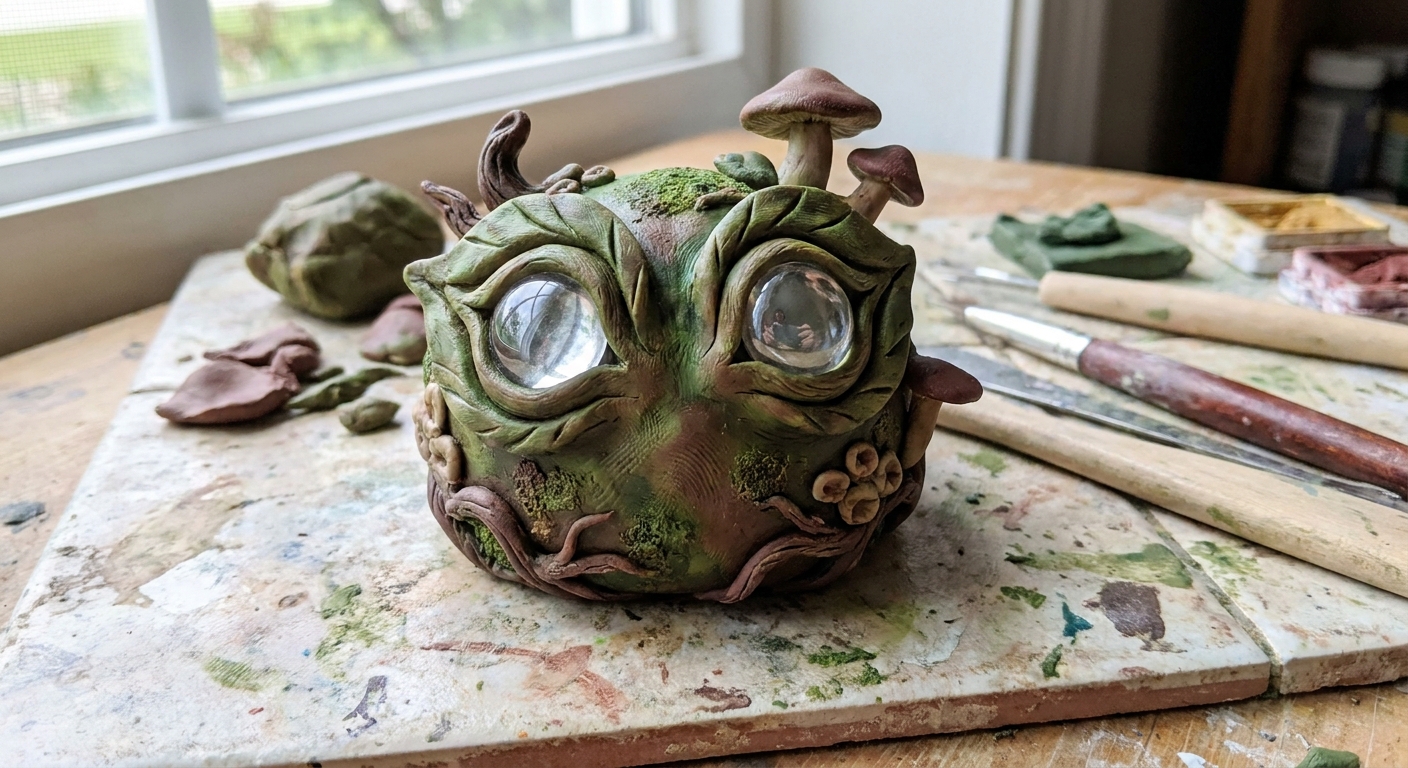
Let's roll out some colorful clay and make something wonderful today! If you want your tiny dragons, forest sprites, and woodland critters to feel instantly alive, glass cabochon eyes are pure magic. The real secret is not just sticking them in. It is building a strong little eye socket so the glass is held mechanically by the clay, then baking in a way that keeps everything snug and crack-free.
Why cabochons need a real socket
Glass is smooth, heavy for its size, and it does not bond to polymer clay the way clay bonds to clay. That means you want the clay to wrap the cabochon at the edges like a tiny bezel. When your socket is shaped well, the eyes stay put even if the finished piece is handled, displayed, or lightly bumped.
Glue can be useful later, but the best durability comes from a good physical fit first, then careful baking, and only then optional adhesive for extra security.
Choose the right cabochon
Make sure they are actually glass
This is the big one: a lot of "glass eyes" sold for crafts are not glass at all. Some are acrylic or resin, and those can warp, bubble, or haze at curing temperatures. If you are not 100% sure they are glass, test one in a scrap bake first.
Sizes that look believable
For miniature fantasy sculpts, eye size changes the whole personality.
- 4 to 6 mm: tiny birds, mice, sprites, and delicate woodland creatures
- 6 to 10 mm: small dragons, cats, foxes, and most palm-sized critters
- 10 to 14 mm: chubby dragons, owls, and cartoonish creatures with big expressions
Flat back versus domed back
- Flat back cabochons are usually easiest because they sit stably in a socket.
- Very rounded backs can rock in the clay unless the socket is deeper and shaped like a bowl.
Clear eyes, colored eyes, and painted backs
Clear cabochons are popular for fantasy creatures because you can add color behind them. If you plan to paint the back of a clear cabochon for an iris and pupil, let the paint cure fully before embedding and avoid thick paint ridges that prevent a tight fit.
Tools and materials
- Glass cabochon eyes, cleaned and dry
- Polymer clay in your creature color plus a little extra for eyelids
- Ball stylus, dotting tool, or the rounded end of a paintbrush for shaping sockets
- Needle tool or toothpick for marking alignment points
- Soft brush or cotton swab for cleaning clay fuzz
- Baking surface and supports. A ceramic tile is a common choice.
For baking basics and an oven-friendly setup, see essential oven tools for baking polymer clay.
Step by step: embed eyes securely
1) Prep the glass
Even clean-looking glass can have skin oils that make it slide around during sculpting.
- Wash with mild soap and water, then dry completely.
- A quick wipe with isopropyl alcohol on a lint-free cloth also helps.
- Avoid scratching the dome. Scratches can show forever once the eye catches light.
2) Plan placement
Before making sockets, decide your creature's vibe.
- Forward-facing eyes: cute, friendly, dragon hatchling energy
- Slightly wider set eyes: woodland creature sweetness
- More side set eyes: prey animal look, timid or alert
Helpful trick: lightly mark a centerline down the face and a horizontal eye line across the brow area. This keeps your eyes from drifting upward or tilting unevenly.
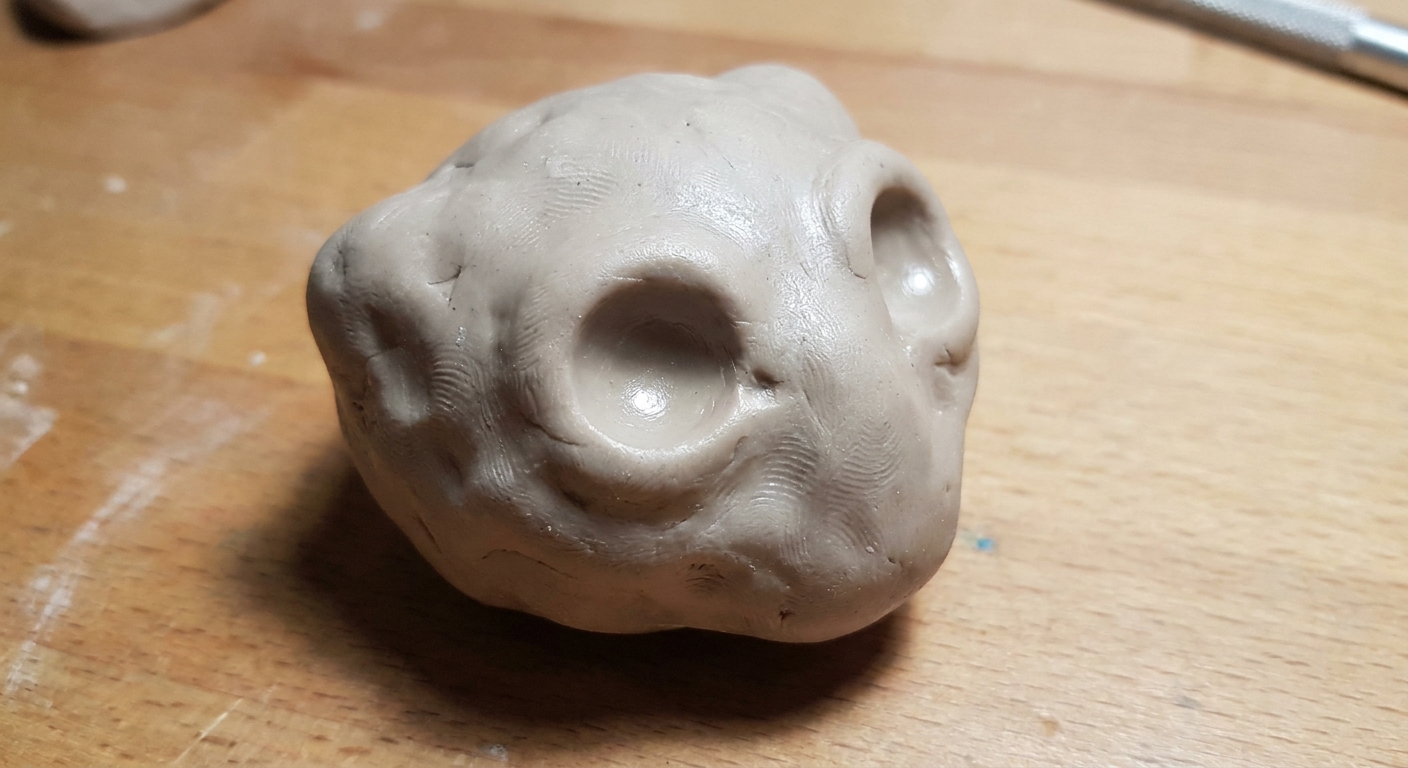
3) Make a matching socket
Instead of jamming the cabochon into a flat surface, build a little nest.
- Press a shallow indentation where the eye will sit.
- Test fit the cabochon. It should sit centered without wobbling.
- Widen the socket gradually. Aim for a snug fit where the clay touches the edge of the cabochon.
Depth rule: the cabochon should sink in enough that you can build eyelids that overlap the edge slightly. If the eye sits on top like a button, it is easier to pop out after baking.
4) Build a thin clay lip
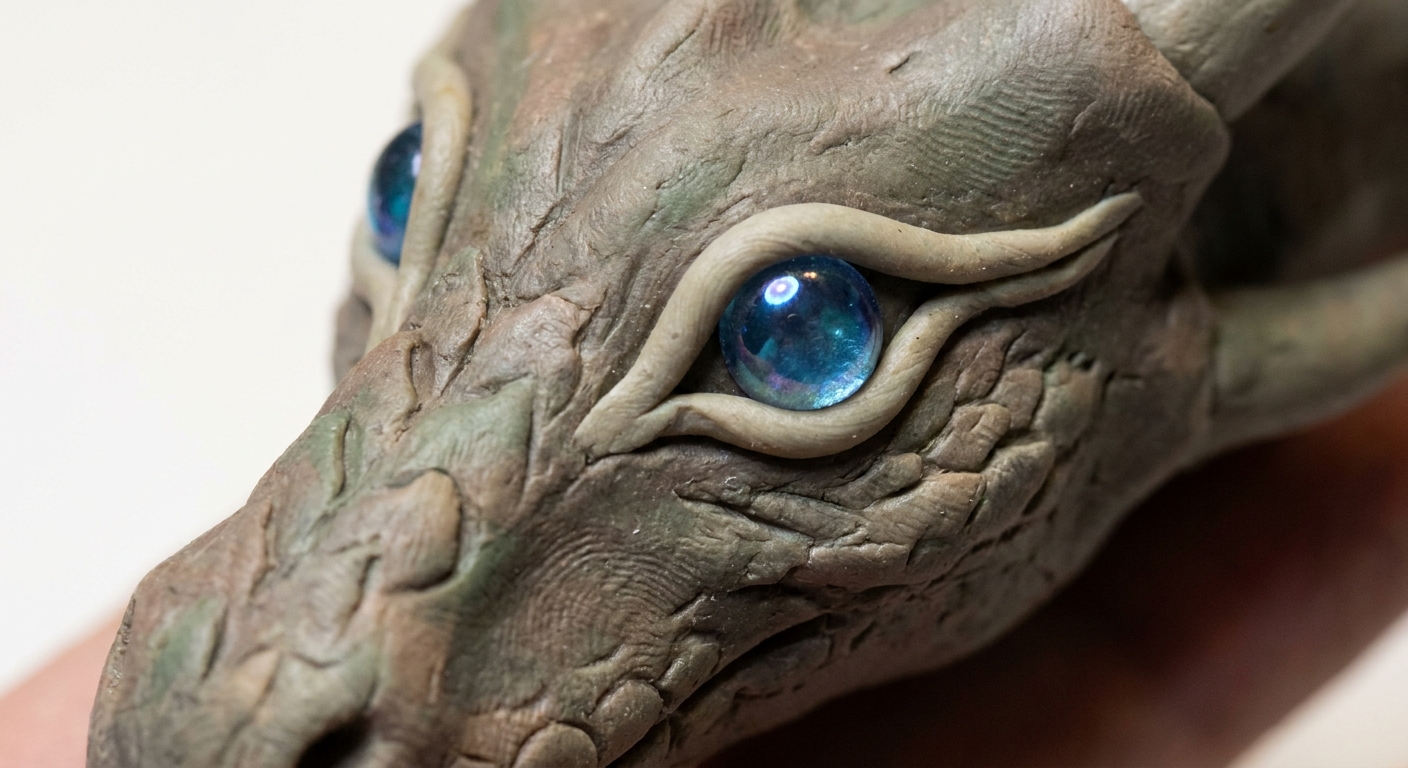
This is the durability step. Add a thin rope or tiny pancakes of clay around the socket edge, then blend it into the face so it becomes a clean eyelid rim. The goal is for the clay to overlap the cabochon edge just a hair, like a miniature bezel setting.
- Keep eyelids thin and even so they do not look bulky.
- Blend outward into the face, not inward onto the glass.
- Any clay left smeared on the dome can bake on and dull the shine, so lift it away with a clean tool instead of rubbing.
5) Press in the eyes last
Once both sockets fit well, press each cabochon in gently and evenly.
- Press straight in, not at an angle.
- Check symmetry from the front, top, and both sides.
- Tweak the eyelids to create mood. Lower lids soften. A heavier upper lid makes a sleepy or grumpy dragon. Raised upper lids make surprise.
6) Smooth around the eyes
Smoothing close to glass is delicate. If you need help with a clean surface, use the same gentle approach you would for any raw clay area, but keep solvents away from painted eye backs.
For general smoothing methods, visit how to smooth raw polymer clay.
Baking without cracks
Support the sculpture
During baking, polymer clay softens slightly before it cures. If your creature is tilted or resting on a cheek, gravity can pull the cabochon a tiny bit.
- Bake heads upright when possible.
- Use crumpled foil, polyester fiberfill, or a small nest of baking support to prevent rolling.
- Make sure nothing presses directly on the glass domes.
If your head is hollow, add a vent
If you sculpt hollow heads, give trapped air a way out. A small vent hole in an unseen spot (like the underside or the back before final detailing) helps prevent pressure from pushing on seams or delicate eyelids during curing.
Match your brand's temperature and time
Always follow the clay brand's instructions for temperature and thickness. Underbaking can leave clay weaker, which matters a lot around a hard insert like glass. Overheating can darken or scorch surface details.
If you are choosing a clay for sculpting strength, see Premo vs Fimo vs Cernit polymer clay.
Cool slowly
Glass and polymer clay cool at different rates. Let the piece cool gradually on the baking surface before handling. That gentle cooldown can help reduce stress cracks around the socket, especially if the eyelids are very thin.
Extra security after baking
If your socket fit is good, you may not need glue at all. But for pieces that will be handled often, a little extra reinforcement can be nice.
When glue helps
- If the cabochon sits mostly on the surface instead of being cradled.
- If the sculpture will become a keychain, bag charm, or handled miniature.
- If you notice even a slight wiggle after baking and cooling.
Where to place glue
Add adhesive from the inside when possible. For example, if the head is hollow or has an opening, a small bead of glue behind the eye can lock it in without fogging the dome. Avoid smearing glue on the visible glass.
Glue types to consider
For glass plus cured polymer clay, a small amount of two-part epoxy is a solid choice, and gel cyanoacrylate can work if used sparingly. Cyanoacrylate is also the one most likely to "bloom" and fog clear domes, especially if you use too much or trap fumes in a closed space. Hot glue can soften with heat and is usually not my first pick for tiny eyes.
For glue and findings safety notes that also apply to mixed media pieces, see hypoallergenic earring findings and glues for polymer clay.
Common problems
The cabochon pops out
- Cause: socket too shallow or no clay overlap.
- Fix: re-seat the eye with fresh clay eyelids that wrap the edge, then rebake. Polymer clay can be baked more than once when done at the correct temperature.
Cracks around the eyelids
- Cause: eyelids too thin, sharp transitions, or stress from cooling.
- Fix: patch with a very thin layer of raw clay, blend well, and rebake. If the piece is already fully cured and you need a repair, see how to fix cracked or broken baked polymer clay.
Cloudy film or fingerprints
- Cause: clay residue or oily fingerprints baked onto the surface.
- Fix: after baking and cooling, gently clean the glass with a soft cloth. If residue is stubborn, a tiny bit of rubbing alcohol on a cotton swab can help. Keep it away from any painted surfaces or varnish.
Eyes look cross-eyed
- Cause: sockets not aligned to a centerline, or one eye is deeper.
- Fix: before baking, remove and reset the eyes using guide marks. After baking, the best fix is usually to adjust eyelids and brows to rebalance the expression.
Positioning ideas
Baby dragon
- Large eyes relative to head size
- Forward-facing
- Thicker upper lid for a cuddly, storybook look
Forest fox or fawn
- Slightly wider set eyes
- Gentle lower lid curve
- Subtle brow ridge
Owl or magical bird
- Very large eyes
- Deep sockets with a defined rim
- Consider a thin ring of darker clay around the eye to mimic feathered eye discs
FAQ
Can cabochons go in the oven?
If they are truly glass, they are typically fine at polymer clay curing temperatures. Avoid sudden temperature changes, and let the piece heat up and cool down gradually to reduce the risk of thermal shock. If you are unsure whether your eyes are glass, do a test bake with a spare.
Should I glue before baking?
Usually no. A good socket and eyelid overlap do the main job. Glue before baking may create fumes, haze, bubbling, or shifting depending on the adhesive, and some glues simply weaken with heat. If you want extra hold, it is typically safer to add glue after baking and cooling.
How much should the eyelid overlap?
Just a tiny amount, enough to create a mechanical grip at the edge. If the eyelid covers too much of the dome, the eye can look dull or smaller than intended.
How do I make the eyes extra shiny?
Glass is already naturally shiny. If your creature has clay eyelids that you want glossy, choose a compatible finish for polymer clay. Learn the options in polymer clay glazes explained.
One last cozy tip
If you ever feel stuck, treat the eyes like the creature's tiny compass. Set them first, then let the eyelids, brows, and snout build the personality around them. With a snug socket and a gentle bezel of clay, those glass cabochons will stay right where they belong, sparkling back at you.
More sculpting inspiration lives in Charms & Figurines.